Laurie Anne Walden, DVM Photo by Tran Mau Tri Tam Photo by Tran Mau Tri Tam Urinalysis is part of the diagnostic workup for many medical conditions, such as kidney disease, diabetes, and urinary tract infection. Pets that are urinating in unfortunate locations need urinalysis because inappropriate urination can be a symptom of a medical problem. Routine wellness checks, especially for senior animals, often include urinalysis. Urine is also collected for bacterial culture and other tests.
Urinalysis includes measurement of urine concentration, chemical analysis, and examination under a microscope. The results are affected by the age of the urine and the way the sample is collected. Urine begins to change soon after it’s voided, so urine samples need to be very fresh, ideally delivered to the veterinary clinic within an hour. The collection container needs to be completely clean, with no residue from food or cleaning solutions that can affect the chemical test results. Debris in a urine sample interferes with the chemical analysis and microscopic examination. Urine can be collected either at home or at the veterinary clinic, depending on the reason the sample is needed and individual pet and household factors (such as the animal’s temperament and medical conditions, owner’s ability to collect urine, and distance to the clinic). Home urine collection is fine for most routine urinalysis, but check with your veterinarian to be sure it’s appropriate for your pet. Sometimes urine needs to be collected in a sterile manner at the veterinary clinic. In these cases, urine is usually collected by cystocentesis, a technique using a needle inserted directly into the bladder. General Urine Collection Tips
Collecting Urine From Dogs
Collecting Urine From Cats
Photo by Tran Mau Tri Tam on Unsplash Laurie Anne Walden, DVM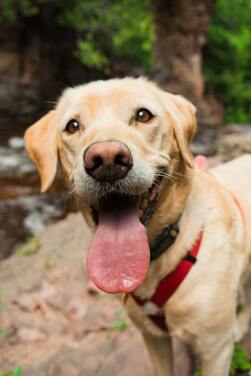 Photo by Lucas Ludwig Photo by Lucas Ludwig Pets need stool tests to screen for parasites or help find the cause of diarrhea and other digestive system problems. Collecting a stool sample at home is the least stressful option for the pet. The alternative is for someone at the veterinary clinic to use a loop to remove a little bit of stool from the rectum. This option yields a much smaller sample and can be unpleasant for the animal.
A fecal test for parasites involves mixing the stool sample in a flotation solution and either spinning it in a centrifuge or leaving it to sit in a vial for a certain amount of time. The material at the top of the solution is then removed to a microscope slide to look for parasite eggs that have floated to the surface. Sometimes a tiny bit of stool is smeared directly onto a microscope slide for examination. Fecal analysis can also include chemical tests. For all of these tests, the stool needs to be fresh and squishy enough to mix or smear. The age and condition of a stool sample affect the results. Parasite eggs can dry out or hatch in old stool. Hard, dry feces is very difficult or impossible to prepare for testing. Stool that has been sitting outdoors for a while can contain fly eggs or larvae (maggots). Liquid diarrhea that’s soaked into paper or cloth can’t be mixed in solution to test for parasites. Here’s how to collect a stool sample to get the most accurate results:
Photo by Lucas Ludwig on Unsplash Laurie Anne Walden, DVM Photo by Haley Owens Photo by Haley Owens Socializing young kittens and puppies means giving them positive experiences with things they’ll encounter throughout their lives. Building positive associations early in life helps animals feel comfortable with new people and new situations. Animals that are well socialized when they’re young are less likely to develop fear-based behavior problems (like aggression) that could put them at risk of being sent to a shelter or euthanized later on.
Sensitive Period for Socialization For kittens, the window of opportunity for socialization is very early: from 3 weeks to about 7 to 9 weeks of age.[1,2] The sensitive period is the time when a young kitten’s brain is most receptive to socialization. During these early weeks, a kitten is exploring and learning, developing neurological pathways that will help the kitten learn in the future. After the sensitive period, brain development shifts; kittens don’t make positive associations as quickly or easily and they’re more likely to be afraid of new things. This is why it’s so difficult, if not impossible, to convert a semi-feral adult cat into a cat that can be happy living as a house pet. You will have noticed that the sensitive socialization period for kittens is nearly closed by the time they’re typically adopted or purchased. Socialization needs to start with the person caring for the mother cat and newborns. When you adopt or buy a kitten, continue providing socialization (at the kitten’s comfort level and pace) to reinforce what the kitten has already learned. The socialization process should always be positive. Don’t force kittens to interact with strangers or other animals if they’re shy, and don’t push them to be near things that scare them. Let them choose whether to interact. Give them room to walk away and let them hide if they want to. Use positive reinforcement (food or play) to encourage them to interact and build their confidence. The following suggestions are adapted from the American Veterinary Medical Association.[1] For more tips, check out the First Year of Life page on the Cat Friendly Homes website: https://catfriendly.com/life-stages/first-year-life/ Socializing Kittens Before Weaning
Socializing Kittens 8 to 12 Weeks Old
Older Kittens and Newly Adopted Adult Cats
References 1. Welfare implications of socialization of puppies and kittens. American Veterinary Medical Association. June 9, 2015. Accessed July 8, 2022. https://www.avma.org/resources-tools/literature-reviews/welfare-implications-socialization-puppies-and-kittens 2. Todd Z. The sensitive period for socialization in puppies and kittens. Companion Animal Psychology. July 26, 2017. Accessed July 8, 2022. https://www.companionanimalpsychology.com/2017/07/the-sensitive-period-for-socialization.html Photo by Haley Owens on Unsplash Laurie Anne Walden, DVM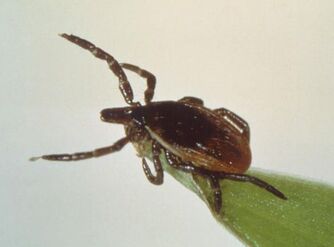 Deer tick (Ixodes scapularis). Public domain image from CDC. Deer tick (Ixodes scapularis). Public domain image from CDC. Lyme disease is the most common tick-borne disease in humans in the United States.[1] Dogs can be infected with the bacteria that cause Lyme disease but are much less likely than people to develop symptoms.
Transmission Lyme disease is caused by infection with Borrelia burgdorferi bacteria, which are transmitted through tick bites. The tick responsible for infection in the eastern United States is Ixodes scapularis, the deer tick (also called the blacklegged tick). Deer ticks persist in the environment because they’re maintained in populations of deer and other wild animals. For this reason, Lyme disease is endemic—always present in the environment—in some parts of the country. Deer ticks are smaller than American dog ticks and can be hard to see on animals with fur. The immature nymph stage, which can also transmit B burgdorferi, is tiny and even harder to spot. Ticks live in woods, grassy areas, and underbrush. Ticks can’t jump or fly; they wait on the tip of a branch or grass blade until a person or animal brushes past, then they latch on. Adult deer ticks can be active when the weather is cool, so Lyme disease isn’t just a summertime risk. Ticks transmit bacteria to the host animal while they’re taking a blood meal. It takes a day or two for B burgdorferi to pass from a tick into a host, so removing ticks within 24 hours reduces the risk of Lyme disease. Humans and dogs don’t spread Lyme disease directly to each other, but dogs can bring ticks into the home. Infection in one host species also means that another host species living in the same environment is at risk. If a dog has a positive test for B burgdorferi, for example, that means the dog has been exposed to ticks carrying the bacteria, and people in the dog’s household are at risk for Lyme disease from the same ticks. Symptoms Most dogs (95%) infected with B burgdorferi don’t develop any symptoms. In dogs that become ill, symptoms start 2 to 5 months after infection and include fever, loss of appetite, and lameness that can shift from one leg to another. Some infected dogs develop kidney disease. Cats can be infected with B burgdorferi, but whether they actually get sick from the infection is unknown. Diagnosis Many dogs are routinely tested for B burgdorferi antibodies at the same time as their annual heartworm test. Antibody tests show whether a dog has been exposed to the bacteria. The American College of Veterinary Internal Medicine recommends yearly antibody tests for all dogs living in or near areas where Lyme disease is endemic.[2] Dogs that test positive have further blood and urine tests to check kidney function and uncover other problems. A positive antibody test in a healthy dog also indicates a possible risk of Lyme disease for people living in the same environment. Diagnosing Lyme disease in dogs with symptoms is not always straightforward. The same symptoms are caused by many different conditions. A positive antibody test means that at some point the dog was bitten by a tick carrying B burgdorferi, not necessarily that the infection is causing the current symptoms. A diagnosis is usually based on antibody test results (possibly more than 1 type of test), symptoms consistent with Lyme disease, lack of evidence of other causes of symptoms, and response to treatment. Treatment Dogs with symptoms of Lyme disease are treated with antibiotics. Dogs that develop kidney disease need additional treatment. Prevention Tick control is the best way to prevent Lyme disease. Many tick preventives are available for dogs; some are given by mouth and others are applied to the skin. Your veterinarian can suggest products best suited to your dog. Some products are available only by prescription. The CDC website has lots of information about preventing tick bites in people and pets. See “Preventing Tick Bites” in the Lyme disease section of the CDC website: https://www.cdc.gov/lyme/prev/index.html Vaccines for Lyme disease are available for dogs. Your veterinarian can advise you on whether you should consider having your dog vaccinated. References 1. Lyme disease. Centers for Disease Control and Prevention. Accessed June 25, 2022. https://www.cdc.gov/lyme/index.html 2. Littman MP, Gerber B, Goldstein RE, Labato MA, Lappin MR, Moore GE. ACVIM consensus update on Lyme borreliosis in dogs and cats. J Vet Intern Med. 2018;32(3):887-903. doi:10.1111/jvim.15085 Ixodes scapularis image source: CDC Laurie Anne Walden, DVM Photo by Kadarius Seegars Photo by Kadarius Seegars Essential oils are compounds that give plants their scent and taste. They are volatile compounds, meaning that they evaporate quickly and release chemicals into the air. Essential oils are in many products: aromatherapy products, home fragrances, flavorings, personal care items (like shampoo), “natural” remedies, insect repellents, and so forth.
Essential oils can sometimes be dangerous for pets, so be aware of the possible risks if you use these products. Whether an essential oil will cause a problem for an animal depends on the type of exposure, the concentration of oil, the animal’s individual risk factors, and the type of oil. The following essential oils are known to be toxic to cats and dogs, according to the Pet Poison Helpline.[1,2]
How Animals Are Exposed Essential oils enter the body through the skin, by swallowing, or by inhalation. Pets are most often exposed to toxic levels when owners apply an essential oil directly to the skin or fur in an attempt to treat a skin condition or repel fleas. The oil is absorbed into the body through the skin, and the animal is further exposed by licking oil from the fur. The risk increases with higher concentrations of essential oils. Products containing a high percentage of essential oil (approaching 100%) should never be applied directly to an animal’s skin or hair. Diffusers spread the fragrance of essential oils into a space. Passive diffusers work through evaporation: they send the scent of the oil, but not the oil itself, into the air. Passive diffusers are mainly a risk if a pet knocks one over and licks the oil or gets oil on the fur. Active diffusers (like nebulizers and ultrasonic diffusers) send actual particles of oil into the air. Oil from active diffusers can get onto an animal’s skin or be inhaled into the lungs, so the animal can have direct exposure to the oil without touching the diffuser. Strong odors from either type of diffuser can cause respiratory tract irritation. Animals at Risk Cats are at higher risk from essential oils than dogs are. Cats lack a liver enzyme that helps eliminate essential oils from the body. Cats and other animals that groom themselves are also more likely to swallow oil that’s collected on the fur. Animals with asthma or other respiratory problems are at higher risk than others from inhalation exposure from diffusers. Birds are very sensitive to respiratory irritants, so diffusers can also cause problems for them. Symptoms Depending on the type of oil and the amount of exposure, essential oil toxicity can cause vomiting, diarrhea, drooling, tremors, loss of balance, skin irritation, coughing, difficulty breathing, low heart rate, low body temperature, rear leg paralysis, and liver failure. Animals with symptoms of essential oil poisoning need veterinary care and might need to be hospitalized for intensive care. Using Essential Oils Safely Use essential oils with caution if you have pets. These tips can help keep your pets safe:
References 1. Benson K. Essential oils and cats. Pet Poison Helpline. Accessed June 4, 2022. https://www.petpoisonhelpline.com/blog/essential-oils-cats/ 2. Marshall J. Essential oils and dogs. Pet Poison Helpline. Accessed June 4, 2022. https://www.petpoisonhelpline.com/pet-safety-tips/essential-oils-dogs/ Photo by Kadarius Seegars on Unsplash Laurie Anne Walden, DVM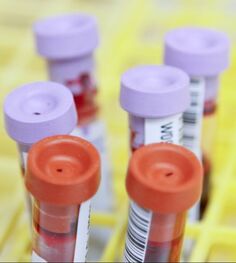 Photo by Daniel Sone, National Cancer Institute. Photo by Daniel Sone, National Cancer Institute. Laboratory testing of blood, urine, and stool samples is routinely done for animals. Abnormalities often show up on lab tests before an animal has obvious symptoms. Even healthy pets need to be tested regularly for parasites. Well-animal tests can detect problems early and help veterinarians track changes over time. These are some of the reasons your veterinarian might recommend lab tests for your pet:
Complete Blood Count A complete blood count measures the number, size, and shape of each type of cell in the blood.
Blood Chemistry Panel Blood chemistry tests measure substances in the blood that indicate changes in organ function or other biological processes. Blood chemistry analysis is run as a panel of many individual tests. A chemistry panel doesn’t always give a diagnosis for a sick animal, but the results can help the veterinarian narrow down the list of possibilities. Veterinary laboratories offer many chemistry panels for different species and diagnostic needs. A small panel that’s sufficient for a young animal before routine surgery might not be appropriate for an ill animal or an older pet. These are a few of the tests commonly included in chemistry panels:
Urinalysis Analysis of the urine includes specific gravity (a measure of urine concentration), pH, chemistry results like glucose and protein levels, and microscopic evaluation for cells, crystals, and bacteria. Urinalysis can reveal urinary tract infection, support a diagnosis of diabetes, and help evaluate the function of the kidneys and other organs. A complete laboratory analysis—especially for a senior pet—should include urinalysis. Parasite Tests Parasites are very common in pet animals (unless they have received regular parasite prevention as recommended by a veterinarian). Many of the parasites that pets carry are contagious to people. At least once a year, pets should have a stool test for intestinal parasites like hookworms and roundworms. Dogs should also have a yearly blood test for heartworm disease. Public domain image source: National Cancer Institute, Daniel Sone (photographer) Laurie Anne Walden, DVM Photo by Oscar Sutton Photo by Oscar Sutton The goals of first aid are to stabilize the animal for transport to a veterinary clinic, keep the animal’s injury from getting worse, and avoid harm to people handling the animal. First aid can save an animal’s life, but it does not replace care at a veterinary hospital.
Keep a first aid kit for your pets. Have contact information for animal poison control and nearby veterinary emergency clinics on hand. If possible, call the emergency clinic before you arrive with your pet. Handling an injured animal
Bee stings/insect bites If you can see the stinger in the animal’s skin, carefully remove it. Swelling of the face or throat that causes difficulty breathing is a medical emergency. Contact a veterinarian before giving any medication. Bleeding For external bleeding from a skin wound, apply gentle pressure with a gauze pad or clean cloth for at least a couple of minutes, until the blood clots. Do not use a tourniquet unless blood is spurting from a wound and the animal’s life is in danger (tourniquets can cause serious damage). Burns For thermal or electrical burns, remove the source of heat or electricity and apply cool compresses with a wet cloth. For chemical burns, flush the area with a large volume of water. Do not apply butter, ointment, or ice to the burn; seek veterinary care instead. Choking Coughing and reverse sneezing can be mistaken for choking. If the animal is truly choking on something in the throat, do a finger sweep of the mouth (only if you can do so without being bitten) and remove the object if possible. Be careful not to push the object farther down. If the animal collapses because of choking, try the Heimlich maneuver: lay the animal on its side and strike the rib cage a few times with the flat of your hand. Fractures In most cases you won’t know if your pet really has a fracture until a veterinarian has taken radiographs. Minimize your pet’s movement as much as possible during transport. Don’t give pain medication unless a veterinarian has specifically recommended it. Don’t try to splint the limb; the splint might make things worse and you could be bitten in the attempt. Heat stroke Heat stroke can happen quickly, especially if an animal is left in a car in warm weather. First aid should not delay immediate transport to a veterinary clinic. If you can’t transport the pet right away, move the pet into a cooler, shaded area. Apply towels soaked in cool water or pour cool water over the animal’s body, especially the neck, armpits, belly, and groin (between the back legs). Don’t use ice. Not breathing, no heartbeat Unfortunately, most animals with cardiac arrest die, even if they receive cardiopulmonary resuscitation. If you try resuscitation, it’s best to do it on the way to the veterinary clinic while someone else drives (no delay in transport). The first step is to check inside the mouth for an object blocking the airway. Then hold the mouth closed and breathe into the animal’s nose until the chest expands. Breathe every 4 to 6 seconds, checking after every few breaths to see if the animal can breathe on its own. After you have begun rescue breaths and if the animal still has no heartbeat, begin chest compressions. Lay the animal on its right side, place one hand under the ribs, and place the other hand on top of the ribs at the widest part of the rib cage (just behind the elbow). Push down on the ribs at least 1 inch, more for large dogs. For cats and other very small animals, cup the chest in one hand and squeeze the ribs between the thumb and fingers. Apply 80 to 120 compressions per minute for large dogs and 100 to 150 compressions per minute for cats and small dogs. Every 4 to 6 seconds, stop the chest compressions and give a breath. Continue until you have arrived at the clinic or the animal’s heart is beating and the animal is breathing. Poisoning If you think your pet has eaten or been exposed to a dangerous substance, call a veterinary clinic or an animal poison control hotline. Note the time of exposure, the amount you think your pet swallowed or was exposed to, and the symptoms. Keep the packaging material, if available, so the ingredients can be identified. If your pet vomits, take a sample of the vomit to the veterinary facility in case it’s needed for analysis. Don’t give anything to induce vomiting unless a veterinarian or animal poison control specialist has specifically recommended it. Seizure If possible, time the seizure and note what the animal did before, during, and after the convulsions (for example, acting “spaced out,” paddling the legs, or urinating). Keep your hands away from the animal’s face and don’t try to hold the animal. Move objects that could hurt the animal out of the way. If the animal is having a seizure near stairs, the edge of a deck, or another drop, use a physical barrier to keep the animal from falling. Snakebite Snakebites can be very painful, so use a muzzle to protect yourself from being bitten by your pet. Take a photo of the snake if possible, but stay away from it! Don’t try to catch or kill the snake. Keep your pet as calm as you can while you travel to the veterinary clinic. Don’t apply a tourniquet or ice, and don’t try to draw venom out of the wound. For more information
Photo by Oscar Sutton on Unsplash Laurie Anne Walden, DVM Photo by Alvan Nee Photo by Alvan Nee Prepare for pet injuries and emergencies by collecting first aid supplies in advance. You can purchase a pet first aid kit or make your own. Some of the items in a family first aid kit can also be used for animals.
Emergency clinic contact information Keep a list of phone numbers of emergency clinics in your area and at travel destinations. Include animal poison control phone numbers in your list. Emergency clinics can be very busy, so if possible have contact information for multiple clinics in case the nearest one has a long wait. Call the clinic before you arrive if your pet’s condition allows time for this. Vaccination records and medical history The most important vaccination record for an emergency clinic to have is the rabies vaccination. A list of current medications and medical conditions will also be helpful, especially if someone who is less familiar with your pet’s medical history (like a pet sitter) might be taking your pet for treatment. Your primary care veterinary clinic might be closed when your pet needs emergency treatment, so have written medical records available for the emergency service. Muzzle Animals in pain can bite even if they are friendly at other times. A muzzle will help you transport your dog safely. The best type of muzzle for a dog is a basket muzzle that allows the dog to pant. You can find inexpensive basket muzzles at pet stores and online. If you plan in advance, you can reduce your dog’s anxiety about using a muzzle during an emergency by training your dog to like wearing a muzzle. See the Muzzle Up Project for tips on muzzle training. (Short version: muzzles are treat baskets!) Don’t try to put a muzzle on a dog if you would be bitten in the attempt. Emergency muzzle alternatives include a leash, rope, necktie, or bandage material wrapped around the mouth. Items that hold the mouth completely closed should never cover the nostrils, should be used only for a very short time (just to get the animal into the car), and should not be used for animals that are vomiting. Another option is to cover the animal’s head with a towel or blanket, but take extra care—animals can bite through cloth, especially if they’re frightened or in pain. Leash or pet carrier A slip leash might be easier than a clip leash to put on a scared dog. For cats, consider keeping a hard plastic carrier with a top that can be removed. If you’ve picked up your cat with a towel, you can bundle both the cat and the towel into the bottom half of the carrier and then reattach the top half. Gauze sponges and nonstick pads Plain gauze squares are used to absorb blood and drainage but are uncomfortable if they stick to a wound. If you’re bandaging a wound, use a nonstick pad as the inner layer (touching the wound) and add layers of plain gauze over the nonstick pad as needed for absorption. Self-adherent bandage wrap (Vet Wrap or similar) Flexible self-adherent wrap is used as the outer layer of a bandage. This material bonds to itself but doesn’t stick to fur. It’s stretchy, so it can cut off circulation if it’s applied tightly. Don’t stretch it while you’re applying it; just lay it over the top of the gauze and press gently to adhere it to itself. Adhesive bandage tape If you have self-adherent wrap, you might not need adhesive bandage tape. Adhesive tape is used to hold a bandage together. For a first aid bandage, try to avoid sticking tape to the fur. If a pet needs a bandage that’s more secure than just self-adherent wrap over gauze, the pet needs to be seen at a veterinary clinic and someone there will be taking your bandage off anyway. Don’t use Band-Aids or other adhesive bandages meant for humans. Bandage scissors Antibacterial ointment Tweezers (for removing ticks) Disposable gloves Eye wash Eye wash or sterile saline is good to have on hand if a potentially damaging liquid gets splashed into an animal’s eyes. Use care when working around an injured animal’s face, though. Towels Towels are handy for mopping up messes, creating an impromptu stretcher, or soaking in water to cool an overheated animal. Medications and other remedies Medications like pain relievers and antihistamines should only be used if a veterinarian has specifically recommended them. Many pain relievers for humans, including common nonprescription pain relievers, are not safe for pets. Some pet first aid supply lists include products to induce vomiting or poison remedies like activated charcoal. Never use products like these without consulting a veterinarian first. Inducing vomiting can be harmful. For example, caustic substances and foreign objects can damage the esophagus on the way down and again on the way back up. Photo by Alvan Nee on Unsplash Laurie Anne Walden, DVM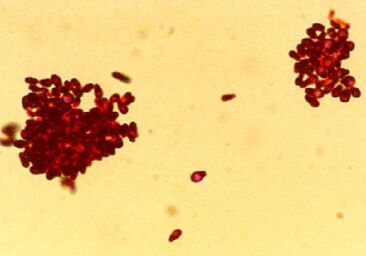 Photomicrograph of Gram-stained Malassezia pachydermatis organisms. CDC/Janice Haney Carr. Photomicrograph of Gram-stained Malassezia pachydermatis organisms. CDC/Janice Haney Carr. Yeast skin infection (dermatitis) is common in dogs and also affects cats. Animals with allergies to pollen, grass, and other substances are especially prone to yeast dermatitis and yeast ear infections, so watch for the signs of infection if your pet gets itchy when the seasons change.
Causes Yeast dermatitis is caused by Malassezia organisms on the skin. Malassezia yeasts are part of the normal collection of microorganisms that live on the skin and in the ears of animals. Yeast dermatitis occurs when something about the host animal—skin condition or immune function—causes Malassezia to overgrow or results in an abnormal immune response to Malassezia organisms. Examples of skin conditions that lead to yeast overgrowth are inflammation and increased moisture. Some animals are allergic to Malassezia and develop yeast dermatitis even when the number of organisms on the skin is relatively low. These are some of the things that increase the risk of yeast dermatitis:
Signs The most commonly affected areas are the face, neck, armpits, belly, inner thighs, feet, and ears, although yeast dermatitis can affect any part of the skin. Yeast dermatitis typically causes these signs:
Diagnosis Samples from affected areas are taken with various methods (tape pressed to the skin, a microscope slide pressed to the skin, cotton swabs, scraping with a blade, or possibly skin biopsy) and examined under a microscope. Animals with yeast dermatitis might have very few Malassezia organisms visible with a microscope. In animals with long-term or recurring yeast dermatitis, other tests are often done to look for an underlying cause. Treatment Yeast dermatitis is treated with topical medication, oral medication, or both. Topical antifungal products include shampoos, mousses, wipes, creams, and so forth. Topical products need enough skin contact time to be effective, so shampoos usually come with instructions not to rinse the lather off for at least 10 minutes. A number of prescription oral antifungal medications are also used. The choice of treatment type—topical, oral, or both—depends on the individual animal, the part of the body affected, the response to earlier treatment, and the ability of the animal’s owner to apply topical treatments. Not everyone has a place to bathe a large shaggy dog twice a week, for instance. Treatment for yeast dermatitis typically needs to continue for weeks. For animals with recurring yeast dermatitis, the underlying cause also needs to be treated. Reference 1. Bond R, Morris DO, Guillot J, et al. Biology, diagnosis and treatment of Malassezia dermatitis in dogs and cats clinical consensus guidelines of the World Association for Veterinary Dermatology. Vet Dermatol. 2020;31(1):28-74. doi:10.1111/vde.12809 https://onlinelibrary.wiley.com/doi/10.1111/vde.12809 Public domain image source: CDC/Janice Haney Carr Laurie Anne Walden, DVM Photo by little plant Photo by little plant The Five Freedoms, which describe animals’ basic welfare needs, are a framework to guide animal care. The Five Freedoms were first developed for the care of livestock,[1] but they apply to all animals under human care.
The Five Freedoms aren’t meant to be rigid, absolute standards; for example, it’s not biologically possible to completely eliminate hunger and thirst. The original Five Freedoms focused on reducing animals’ negative experiences. To reflect better understanding of animal welfare, the framework has been updated to include giving animals positive experiences in addition to limiting negative ones.[2] Meeting animals’ welfare needs helps keep them physically and mentally sound. When you’re caring for pet animals—whether your pets are dogs or frogs—keep the Five Freedoms in mind to be sure you’re giving them everything they need to stay healthy and happy. Freedom From Hunger and Thirst Animals need fresh water and a diet that is complete and balanced for their species and life stage. Animal welfare is enhanced (meaning that animals will be happier) if the eating experience is also enjoyable. For pets, this could mean adding variety to the diet or using food puzzles from time to time. Freedom From Discomfort At its most basic, freedom from discomfort means having shelter and a comfortable place to rest. This category can also include everything in an animal’s environment. How might you enrich your pet’s environment to promote comfort and enjoyment? Would your elderly indoor cat like a soft, easily accessible window seat to watch birds? Could your snake use another hide in the vivarium? Freedom From Pain and Injury Animals should have veterinary care to prevent and treat disease and injury. Caretakers can take other steps to promote health and prevent pain, such as providing appropriate physical activity and avoiding painful experiences. Freedom to Express Normal Behavior The original Five Freedoms specified giving animals sufficient space, proper facilities, and the right amount of company of the animal’s own kind. Animal caretakers can go far beyond these basic recommendations. Think about behavior that is normal for your pet’s species. Dogs chase things and cats sharpen claws, and they need appropriate outlets, not punishment, for these behaviors. The need for companionship depends on the species. Some animals (like guinea pigs) need to live with at least one other of their own species, and others do well living alone. Freedom From Fear and Distress Animals should not be kept in conditions that create anxiety and stress. Pet owners can also give their animals positive experiences to support their mental health. To read more about the Five Freedoms and pets, check out these articles by Dr. Zazie Todd on the Companion Animal Psychology website: What Are the Five Freedoms (and What Do They Mean to You?) The Five Domains Model Aims to Help Animals Thrive References 1. Farm Animal Welfare Council. Report on priorities for animal welfare research and development. May 1993. Accessed March 25, 2022. https://edepot.wur.nl/134980 2. Mellor DJ. Moving beyond the “five freedoms” by updating the “five provisions” and introducing aligned “animal welfare aims.” Animals (Basel). 2016;6(10):59. doi:10.3390/ani6100059 Photo by little plant on Unsplash |
AuthorLaurie Anne Walden, DVM Categories
All
Archives
April 2024
The contents of this blog are for information only and should not substitute for advice from a veterinarian who has examined the animal. All blog content is copyrighted by Mallard Creek Animal Hospital and may not be copied, reproduced, transmitted, or distributed without permission.
|
 RSS Feed
|
Office Hours
Monday through Friday 7:30 am to 6:00 pm
|
|


Site powered by Weebly. Managed by IDEXX Laboratories